Monday 30 May 2011

Fabric heaven...


Today was quite an exciting day because I went shopping for my final fabric for my dress. I felt like a little kid going into a sweet shop when I entered the fabric shop. There were loads of different types of fabrics, threads, ribbons, zips, buttons and many more. I could of spent the whole day just looking at the fabrics.


I really had fun going fabric shopping but the shocking thing is I have spent more than I had expected to. The total came to £87, including the zip, that to me is shocking. Today I have learnt that when you go fabric shopping you should definitely look at the price per meter/kilo because you will be left with no money in your pocket if your on a budget. Here are the fabrics that I have bought today.


bloglovin'

Follow my blog with bloglovin

Substruction Cutting.

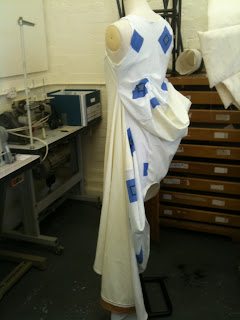
On my personal study day I have created my first independent project which is called substruction cutting. It means taking away spaces to create a pattern for a dress. It was really easy and fun but the only time that I struggled is when I was hemming the dress, this is because it was curved. It was pretty simple all you need is fabric, e.g. bed sheet, curtains, etc, enough to fit around you, bodice pattern and a sewing machine. It is actually exciting because you never know what your outcome will look like until you finish it. You can add and play around with details on your outcome. Here is the outcome that I made from this project.

front

side

back


back


I kept the front of the dress simple and just played around with the back of the dress, adding pleats. So that is it my finish dress. Love to hear your comments.

Thursday 26 May 2011

Final layer...


YES finally I have finish the 1st layer of my dress and I also have attached the bodice of the dress. I am nearly there I just have to finish the sleeve off now and then I can manufacture the whole dress on my final fabric. I am really happy with the outcome but it looks a little different from what I wanted maybe because the fabric is too light so it is not structured enough. Anyways this is the final layer attached to the tube dress.

Front

Back
Now I am currently working on the sleeve pattern so watch out for that.

Tuesday 24 May 2011

layers on....


Once again I have manage to finish another layer for my dress. The image below shows the 2nd layer of the gathered strip attached to the tube dress. I am pleased that I have yet again completed another layer of the dress.

Front 2nd layer

Back 2nd layer

I have also created the pattern for the 1st layer and it is ready to be cut in fabric.

Monday 23 May 2011

Park Bom wearing Alexander McQueen


She's a member of a Korean girl group called 2NE1. They are one of my favorite korean girl group because they are an amazing singers and they also have great fashion sense.


On her latest solo music video 'Don't cry' she wore Alexander McQueen dress which cost $20, 000 USD.


According to the fashion industry representative, the dress has a potential to cost more since it's McQueen's final creation before his death. The dress was under possession by McQueen's family, but after finding out that mcQueen had worked with Big Bang (label-mate) and 2NE1 in the past, they accepted Yang Hyun Suk's (CEO) request to feature it in Bom's latest music video.

3 layers on..


Today my fingers are very very sore. It turns out that gathering fabric is extremely time consuming.
Today I have completed 3 layers and attached them to the tube lining of my dress. I am really pleased with how they are looking.


I am currently working on layer 1 and 2 as they are a little more difficult and I need to keep to my time management plan to meet the fashion show deadline. Getting there now won't be long till this toile is complete.


Sunday 22 May 2011

Gatherings....


Finally I have started to toile the gathering strips for my dress. I have made the pattern for the 3rd, 4th, 5th, 6th, 7th and 8th layers but I have not yet made the pattern for the 1st and 2nd because they are slightly different because they are shaped. I had cut the pattern out in fabric and gathered it but without thinking I forgot to double the length so I had to redraft this pattern.
The arrow shows where the top of the gathering should be. I am glad that I made this mistake now instead of later on because I could have not bought enough fabric which would have been a disaster. :)


Wednesday 18 May 2011

Toiling tube dress...


Today in college I have completed the tube for my dress in calico. In the image below shows the finish outcome that I have achieved in todays lesson, the tube will be the base for the gathered layers of fabric which will be attach later on.

Front tube dress (in calico)


Back tube dress (in calico)


I am really happy that I have completed the tube for my dress. I have also started to pattern the strip for the gatherings which will be divided in 8 layers. The first and second will be slightly different because it curves on the hip so I have to spread the measurement and multiply it 4 times.

This image shows the drawn out lines which represents where each layer will end.


Sampling the bodice


Today in my pattern cutting lesson I have started sampling the bodice for my dress design. First I have experimented with pleats on some fabric which did not work out right because it was too fiddly and it was not the effect that I was aiming for. I discussed another method using three bias cut strips which I would layer one on top of the other. The three strips of bias cut fabric would then mould to the body because of the give of the fabric.

Straight grain fabric strip.

Bias grain fabric strip.


It is important for me to finish the hems by hand stitching them instead of using the sewing machine because I am aiming for the couture market.
Wealth (which is my theme)=couture

3 bias strip layered on top of the other and the hem hand sewn.


Tuesday 17 May 2011

Toiling continued..


In todays session I have completed my facing for the top of my dress. I am very happy with the outcome and it has given it a lot more structure.

Front dress bodice


Back dress bodice


Neck facing


I have also started to flat pattern the tube dress which will be attach to the A-symetrical dress. It will fall to the floor and it will be the base for me to sew the gathered layers on as seen on the previous blog entry.

Front tube dress pattern


Back tube dress pattern


Monday 16 May 2011

A lesson in styling.


Today a freelance stylist named Jemma Sawyer carried out a lecture to my group. She spoke about her job role, what it involves and showed us a powerpoint with examples of her work. I found it interesting and it helped me understand what a stylist does. My initial thought of what stylist does was completely different to what a stylist has to do. I discovered that it was a lot harder than my initial thought and long hours.

A stylist has to consider

  • the client

  • situation

  • the look

  • make-up and hair

  • nails

  • back up options

  • the clients needs

We were asked to carry out a task where Rosie and I were given Adele appearing on Jools Holland, together we help style Adele for this event. Below is a moodboard with the results of this.

Wednesday 11 May 2011

Sampling the bodice


Today in my pattern cutting lesson I have started sampling the bodice for my dress design. First I have experimented with pleats on some fabric which did not work out right because it was too fiddly and it was not the effect that I was aiming for. I discussed another method using three bias cut strips which I would layer one on top of the other. The three strips of bias cut fabric would then mould to the body because of the give of the fabric.

Straight grain fabric strip

Bias grain fabric strip

It is important for me to finish the hems by hand stitching them instead of using the sewing machine because I am aiming for the couture market.
Wealth (which is my theme)=couture


Tuesday 10 May 2011

Shirt with a bishop sleeve.

Yesterday I had my bishop shirt photographed for my portfolio next year. I was really excited to see the photos afterwards and most of them turned out great than I expected. It was my first time going to the studio to get the shirt that I manufactured photographed by one of the students. Here are some of the photographs that I think stood out the most. I will need to photoshop some of the photos to be able to get a stronger outcome for my portfolio.


FRONT


BACK


Here are some close-ups of the shirt and strongest point of the shirt (in my opinion).


BISHOP SLEEVES


COLLAR


CUFF


And here are the not-so-good point of the shirt.


BACK PLEAT

Monday 9 May 2011

Sampling the sleeve.


Today I began to sample the sleeve of my design.
To begin with I was a little unsure on how to attach the puff sections of the sleeve to the strips of fabric. I have sampled gathering on different weights of fabrics e.g. heavy, medium and light. The outcome - the medium weight was easier to gather compared to the other weights and you can create more volume on the fabric by pulling the thread tighter.
After a discussion with my tutor I problem solved how to attach the gathered puff sections of the sleeve to the strips of fabric and this was actually straight forward. I have shown this in a photo below.

I feel more confident about tackling my sleeve and know I will have to use the slash and spread method on my flat patterns.


Sampling


The other day I sat down with my tutor to discuss my chosen design for my final garment. I am REALLY excited about the design that I am going to manufacture. The design that I have chosen is challenging and I am confident about my manufacturing skills.

The layers and the volume all represent wealth.

Friday 6 May 2011

Facing

ON one of my pattern cutting lesson I have finished attaching neck and arm facing on my straight grain cut dress. I found the neck facing easier to insert than the arm because the arm facing takes more time to sew and you need to pivot a lot to be able to go around the arm. Even thought it was quite hard, I still tried my best to perfect it so here is the outcome. I hope you like it and you leave a comment below.

Front:neck facing


Back: neck facing


Front:arm facing

Side:arm facing


Thursday 5 May 2011

Shirt with bishop sleeve.


On tuesday I have finally completed my shirt sample with bishop sleeve, pocket, cuff and collar. It took me about 3 pattern cutting lesson to complete this shirt. Here is my finish outcome.

Front

Back

The shoulders did not turn out right because the pattern that I have used for the shoulders did not match the pattern for the body but other than that I am happy with the outcome.

shoulder

The collar and the cuff/sleeve is the strongest point of the shirt and the not-so-strong point of the shirt would be the back pleat because I did not iron it straight enough but I could work on that in the future.

Collar

bishop sleeve/cuff

Back pleat